Schema compare
Note: This feature is available in Enterprise, Ultimate and Team editions only.
Table of contents
Databases supporting schema comparison
| ----------------------- | ----------------------- |
|---|---|
| Cockroach | Oracle |
| Databricks | PostgreSQL |
| DB2 | Redshift |
| Derby | SAP HANA |
| EnterpriseDB | Snowflake |
| Firebird | SQLite |
| Greenplum | SQLServer |
| Informix | Teradata |
| MySQL/MariaDB | Vertica |
| Netezza | YugabyteDB |
| DB2i |
How it works
You can compare two schema/database structures and generate a report in the following formats:
- DDL script (series of create/alter/drop statements)
- Diff diagram (sort of ER diagram)
- Liquibase changelog
Liquibase change report (JSON, YAML, or plaintext)
What is possible to compare
In most cases, you can compare schemas, databases, or tables. However, some databases (such as SQLite and Firebird) do not have catalogs and schemes that can be compared. In this case (and only for these databases), it is possible to compare the entire datasources.
Usually, you can compare the following database objects: columns, primary keys, foreign keys, indexes, and so on (it depends on your database). If you want to compare more objects, such as check constraints, procedures, functions, triggers, you need to enable Liquibase PRO.
How to use schema compare
Step1. Select two entities to compare
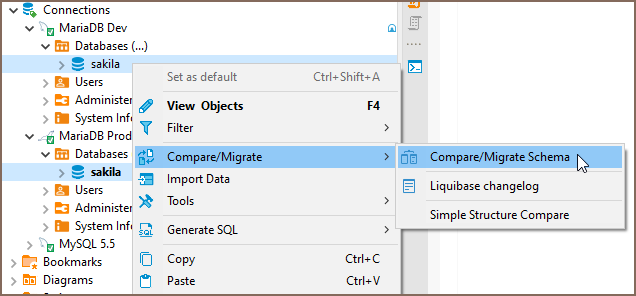
- Select the two objects (schemas, databases, or tables) you want to compare in the Database Navigator.
- Open the context menu.
- Open the sub-menu Compare/Migrate and click the Compare/Migrate Schema. You'll see the comparison window.
Step 2. Check the selected entities
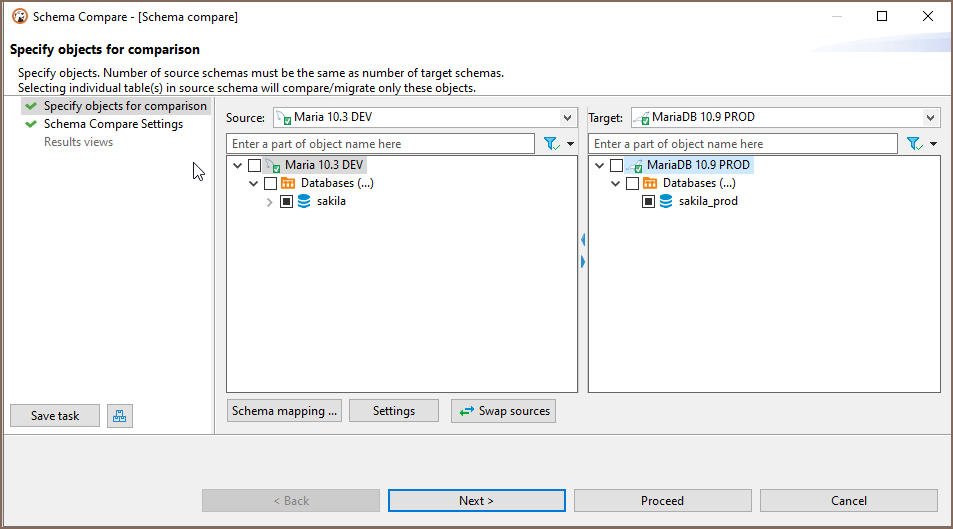
Re-validate that you have chosen the correct objects to compare. You can change target and source containers by clicking the Swap sources.
Note: You must select only those schemas/directories/containers that contain tables:
- Schemas – if the database supports schemas.
- Databases – if the database supports catalogs and does not support schemas.
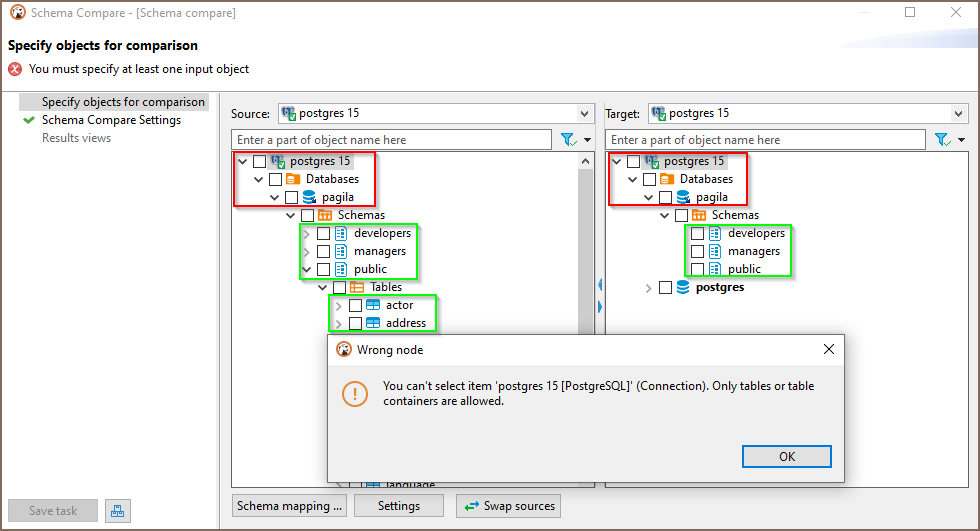
- Datasources – if there is no support for schemas or catalogs.

If everything is correct, click Next. You'll see the comparison settings.
Step 3. Specify compare settings
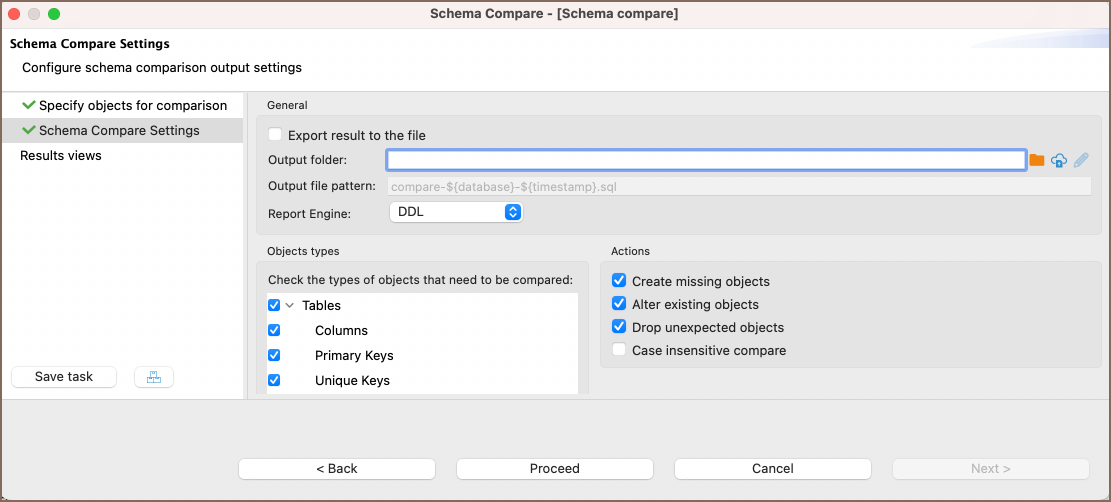
If you want to export the comparison result in a file, select Export result to the file option, then specify the folder and file name. You can use variables in the file name. Click on the field with a file name to see a list of available variables.
Select the report format in the Report Engine field.

You can simply exclude specific types of objects from comparison.
For example, it is possible not to show sequences, views, or external keys in the final comparison result.You can also specify which changes should be processed: create, drop, or alter. By default, all kinds of changes are enabled. If you do not want to compare objects with equal names but in different cases (like "test" and "TesT"), enable the Case insensitive compare. (Note: This settings section is unavailable for the generation changelog process.)
Tip: You can export the results of a schema compare operation to a remote file system via Cloud Storage using the Browser remote file system button
. This feature is exclusively available to users of the Ultimate Edition, Team Edition, and CloudBeaver versions.
Step 4. Look at the comparison results and save the report
Click Proceed to generate a diff report.
Step 4. Comparison results
By default, DDL diff is generated. It contains a series of creating, altering, and/or dropping statements that will modify the schema on the right side. Thus, it will make it identical to the schema on the left side.
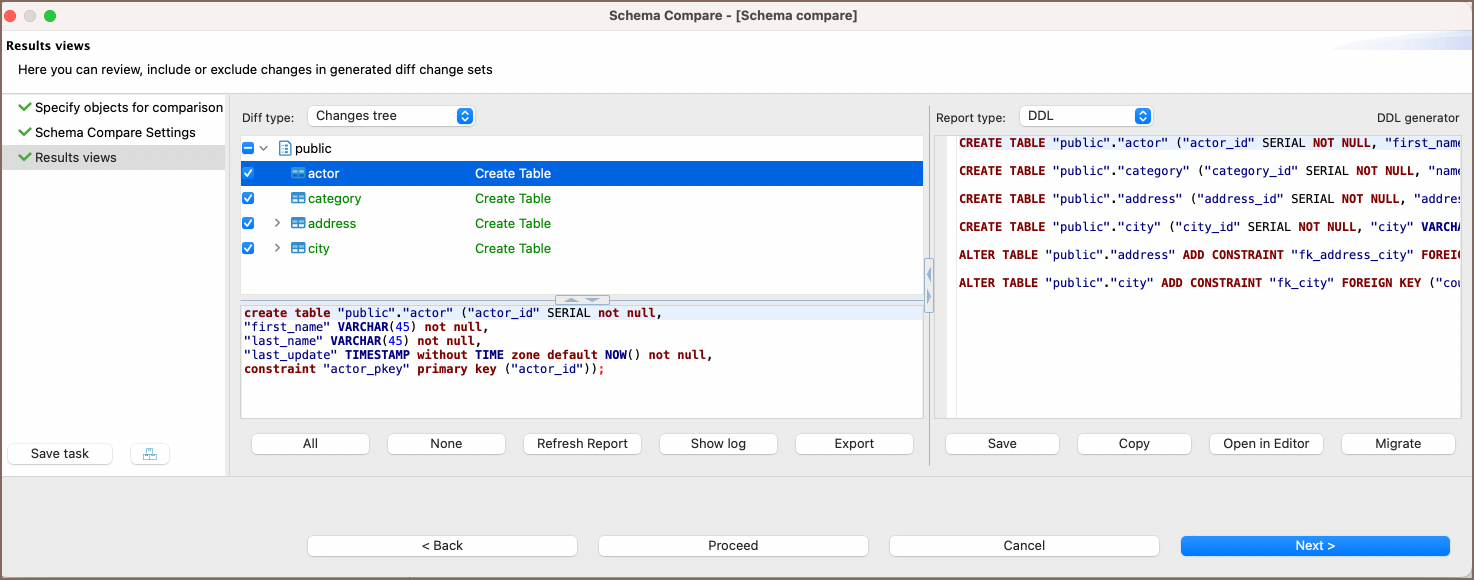
This comparison interface provides a suite of options to manage your results effectively:
| Button/Option | Description |
|---|---|
| All | Enables all changes in the changes tree on the left side of the diff page. |
| None | Disables all changes in the changes tree on the left side of the diff page. |
| Refresh Report | Updates the comparison report to reflect any changes made to the selection or schema. |
| Show log | For detailed information about logs, refer to the section Compare logs. |
| Export | Exports the current diff report to a .txt file. |
| Save | Saves the current state of the report. |
| Copy | Copies the generated SQL or report text to the clipboard for easy pasting elsewhere. |
| Open in Editor | Opens the current diff report in the SQL Editor for further editing or review. |
| Migrate | Executes the generated SQL statements on the target database, applying all selected changes. |
Quote objects names in the report
For the objects in the report to be dressed in quotation marks, select the Quote all objects names option in Preferences.

Compare logs
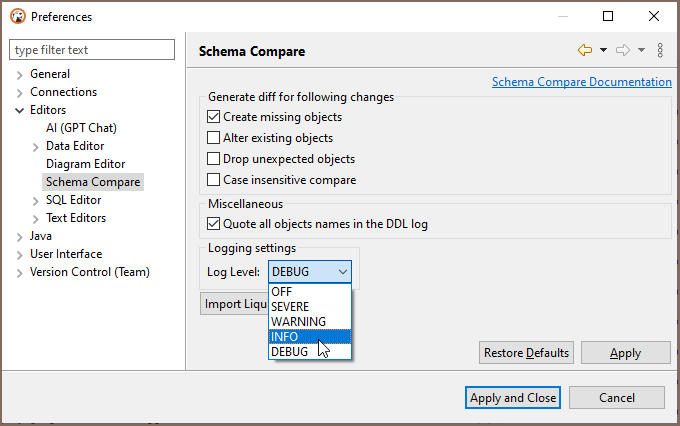
To get acquainted with the comparison logs, you first specify the logging level on the Preferences-> Editors-> Schema Compare preference page. Specify one of the logging levels and click on Apply. By default, the logging level is the OFF level. To get complete information, you can choose the DEBUG level.
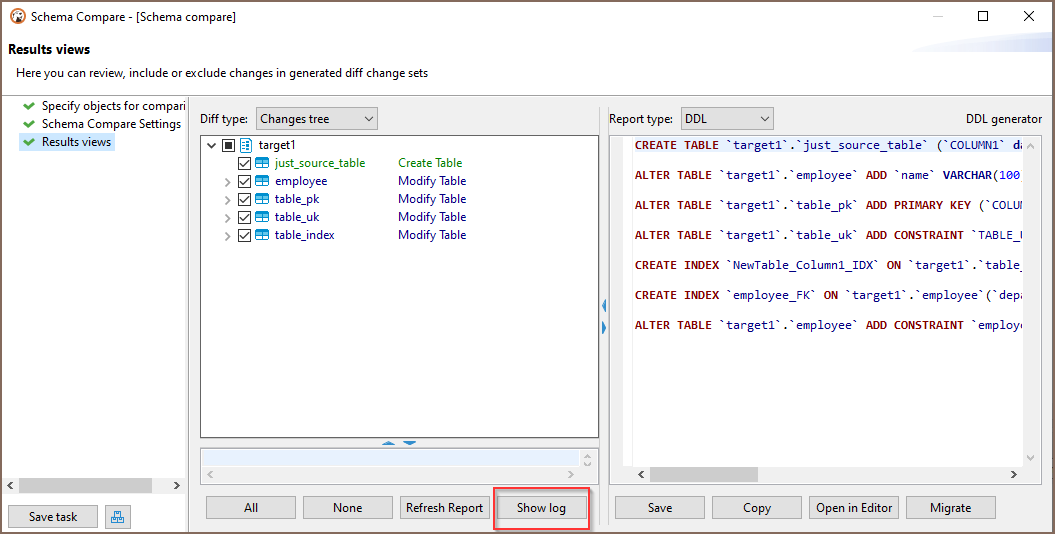
After comparing operations, click the Show log button. A log will be open in the Editor, and the content of this log will depend on the logging level you choose in the settings. Log level changes from preferences will not be applied to the comparison wizard if it is already open in another window. Close and open the schema compare wizard in this case.
Liquibase Changelog generation
Suppose you want to create a report about the objects in your table container (similar to the metadata dump operation). In that case, you can select in the navigator tree on your container Compare/Migrate -> Liquibase changelog command.
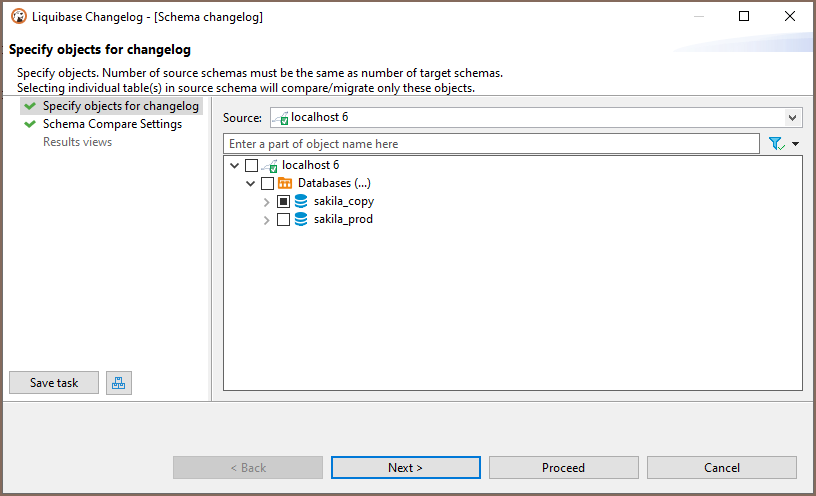
One or several table containers can be chosen. The report will contain creation statements of tables/views/keys/sequences - metadata from the table containers. But without data from tables/views. You can use this report in the future to restore the structure of your database.

Save operation as a task
If you plan to constantly use the comparison or generation changelog/schema comparison, exporting the result as a file, you can save this as a task. The task can be completed anytime and put on the schedule.
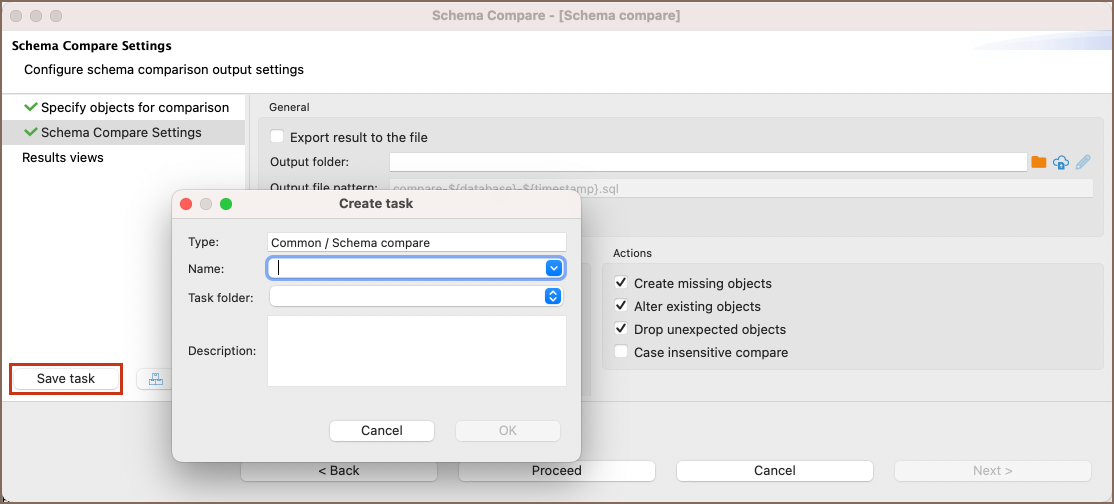
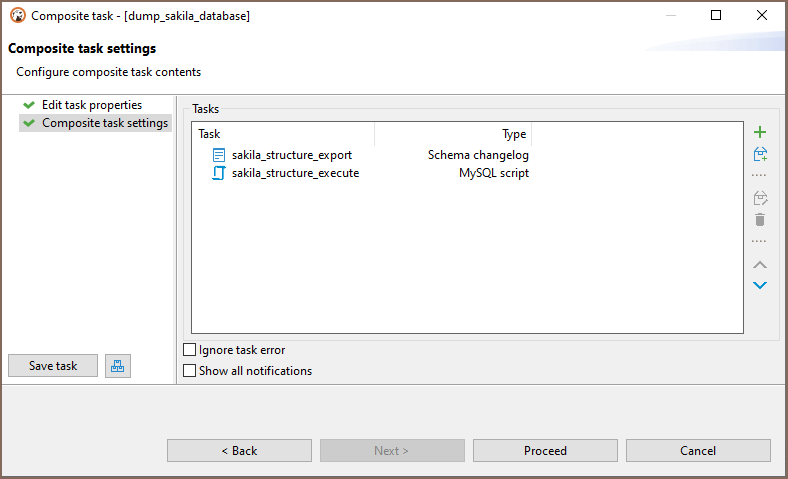
Also, generating a changelog or schema comparison can be part of the composite task. For example, if you keep the log as a script with a certain name, then the implementation of this script can be set by the second operation of the composite task.
Using schema compare with Liquibase PRO key
If you have a Liquibase PRO key, then you can use it with DBeaver. Steps you need:
- Find and open your dbeaver.ini file.
Tip: Detailed instructions on finding
dbeaver.iniare available in our article.
- Find -vmargs command
- Add a new line after this command: -Dliquibase.license.key=yourKey (example: -Dliquibase.license.key=ABwwGgQU...)
- Open DBeaver and the "Schema compare" window. The key will be checked at this step.
You can also add the Liquibase Pro key via UI in Preferences->Editors->Schema Compare preference page.
Use the Import Liquibase Pro Key button to open the Import key dialog.
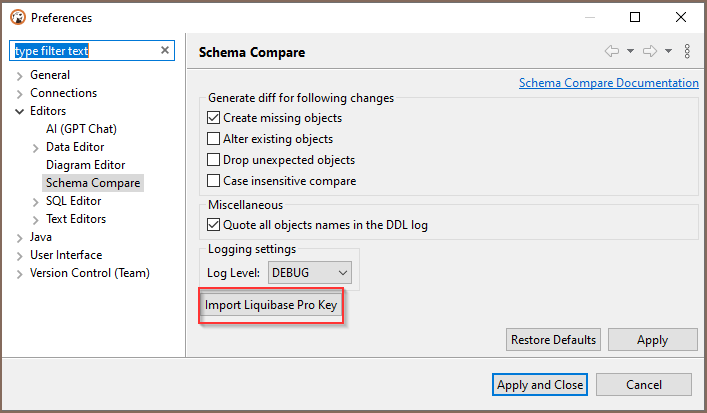
You can manually add your key in the Liquibase Key text field, throw the Paste button, or use the Load button to download a file.
You can check the license state with the Check Key State button. After pressing the button, you can see the result of the checking in the Messages field.
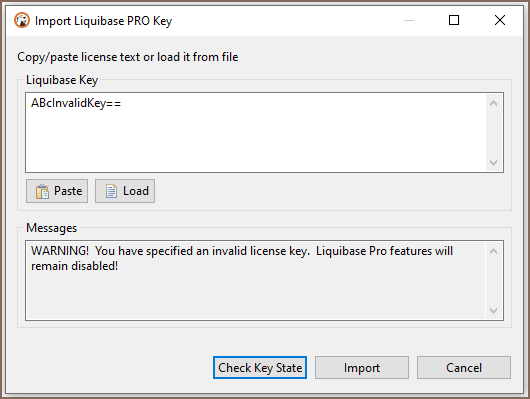
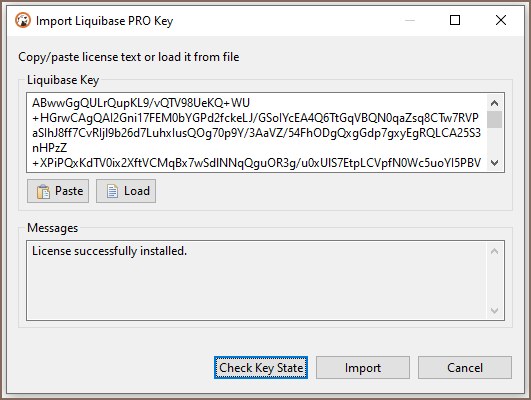
We suggest you restart the program after adding a key for the correct program work. Settings changes will not be applied to the comparison wizard if it is already open in another window. The key will be saved in the DBeaver settings. If you specify the key in the .ini file and install another key through the Import Key dialog, the key from the .ini file will be in priority.
If the license key is valid, the Object types dialog will be extended to PRO objects.
(If PRO objects didn't appear in the schema compare changelog - check your logs. Maybe the license expired, or the key is invalid)
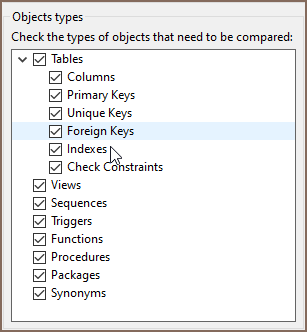
Object types being compared by LiquibasePRO
- Check Constraints
- Procedures
- Functions
- Triggers
- Synonyms (Oracle)
- Package with the body (Oracle)
