SQL Editor
Table of contents
With the SQL Editor in DBeaver, you can write and execute multiple SQL scripts within a single database connection, save them as files, and reuse them later.
Getting started
To start working with the SQL Editor, you have several options:
Via Database Navigator:
- Navigate to your desired database connection in the Database Navigator view.
- Press F4 or go to SQL Editor -> Open SQL script from the main menu, or right-click on the connection and choose Open SQL script from the context menu.
- A Choose SQL Script window appears. Click any script to open it in a new tab.
Open Recent SQL script:
- Right-click on your database connection and select SQL Editor -> Recent SQL script from the context menu or go to SQL Editor -> Recent SQL script from the main menu. Alternatively use the Ctrl+Enter shortcut in the Database Navigator view.
- A Choose SQL Script window appears. Click any script to open it in a new tab.
Create a New SQL Script:
- Navigate to SQL Editor -> New SQL Editor on the main menu.
- Press F3 and click New Script in the Choose SQL Script window.
Note: SQL Editor for a connection is different from SQL console for a table or view. Unlike the console, it can save scripts and changes made to them.
You can see all your saved SQL scripts in the Project Explorer view in the Scripts folder.
SQL Editor overview
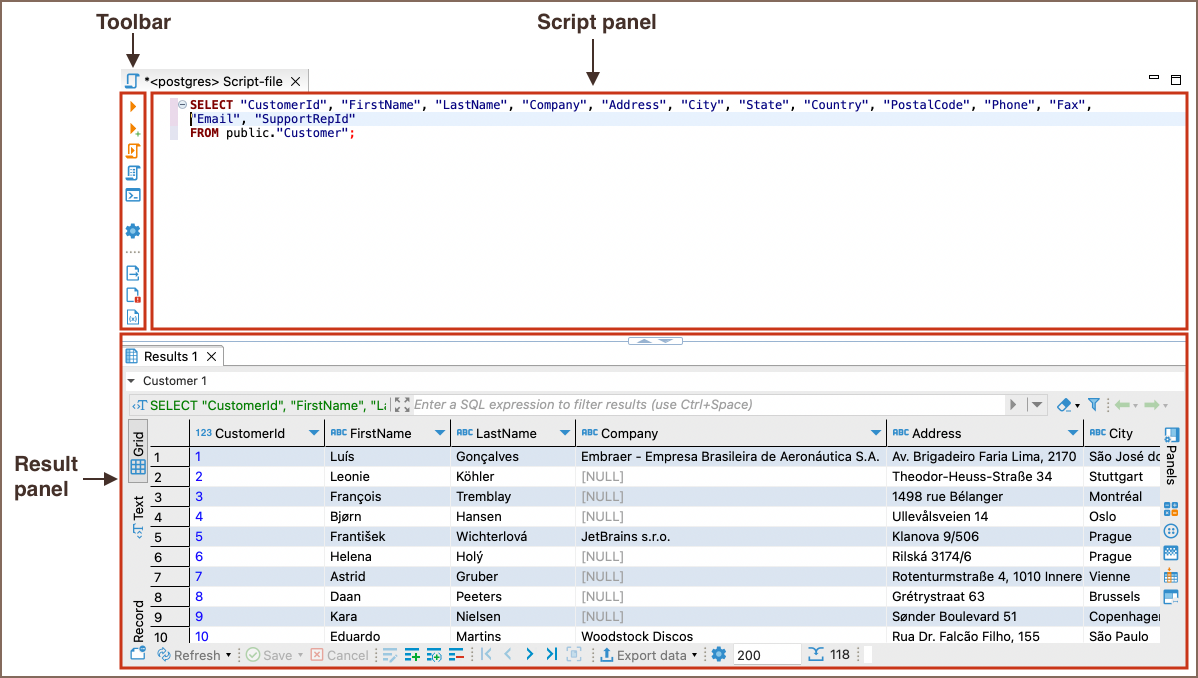
The SQL Editor contains the Script panel, the Toolbar, and the Result panel.

Tip: You can open the SQL editor preferences by pressing Alt+Enter or right-click and navigate to Preferences.
Script panel
The Script Panel is the primary area where you can write, edit, and manage your SQL scripts. It provides basic text editing features with the added benefits of specialized functionalities tailored for SQL development:
Spelling
The panel includes a spelling checker to identify and highlight misspelled words, assisting you in maintaining the quality of your scripts. For more information check out our article.
Hyperlinks
You can press and hold Ctrl and at the same time move the mouse over the SQL text. If DBeaver recognizes some identifier as a table/view name, it presents it as a hyperlink. You can click the hyperlink to open this object`s editor:

Highlighting
DBeaver uses SQL syntax highlighting which depends on the database associated with the script. Different databases have different sets of reserved keywords and system functions. For more information, see the relevant section on highlighting settings in our article on SQL Code Editor.
Toolbar
The toolbar is customizable and contains buttons for commonly used commands. For more information on customization, see our article on toolbar customization.
Results Panel
The results panel displays tabs with results in various formats. The tabs resulting from script execution represent instances of the Data Editor. You can create, edit and execute SQL scripts in the script panel and then see the results in the result tabs.
Multiple results in one tab
You can view and manage multiple query results within a single tab.

To use the Multiple results feature in the SQL Editor, follow these steps:
Add Toolbar Item: Add the Toggle execution result orientation
 to the SQL Editor toolbar.
Alternatively:
- Right-click in the SQL Editor window and navigate to Execute -> Toggle execution result orientation.
- Navigate to SQL Editor -> Toggle execution result orientation.
Toggle: Click the toolbar item to activate multiple query results view.
View results:
- To view multiple results in a single tab, execute queries using the Execute SQL Script button
 .
. - You can collapse some result sets according to your preference by clicking the arrow button
 .
.
- To view multiple results in a single tab, execute queries using the Execute SQL Script button
Important: When using two or more queries in parallel, exercise caution as this may lead to client UI freeze, high database server load, or transaction deadlock.
Additional features
Active Database
You can change the connection associated with the current SQL editor or change the active database/schema, at the same
time retaining the SQL text.
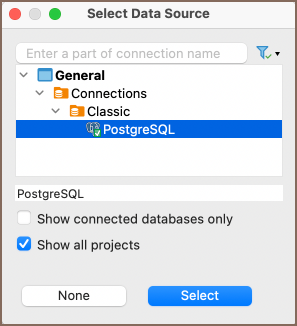
To change the connection, press Ctrl+9 or click the Active datasource box on DBeaver`s main toolbar:
![]()
The Select Data Source dialog box opens. In the tree of connections, click the required connection and then click Select. To disassociate the SQL Editor with any connection, click None:

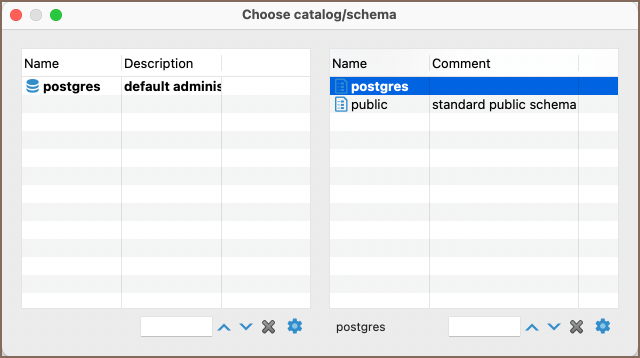
To change the active schema, press Ctrl+0 or click the Active Catalog/Schema box in DBeaver`s main toolbar:
![]()
The Choose catalog/schema dialog box opens. In the list of schemas, double-click the required schema:

If there are many schemas, and they do not fit in the dialog box use the search field ![]() to find the schema.
to find the schema.
To configure the set of columns to be visible for each schema in the dialog box, click the Configure columns
button ![]() .
.
Tip: You can easily associate the SQL Editor with the connection that is currently in focus in the Database Navigator (the
focus can be on any object of the connection - a table, a folder, etc.) - click the Link with editor ![]() or use the shortcut Ctrl+Shift+,.
or use the shortcut Ctrl+Shift+,.
Layout Adjustment
You can modify the layout of the SQL Editor by showing/hiding the results panel and changing the horizontal/vertical position of the panes.
- To toggle (hide/show) the results panel, press CTRL+6 or right-click anywhere in the script pane and, on the context menu, click Layout -> Toggle results panel.
- To maximize the results panel, press CTRL+Shift+T, or double-click the results tab name, or right-click anywhere in the script panel and, on the context menu, click Layout -> Maximize results panel.
- To switch between the script panel and the results pane, press Ctrl+Alt+T or right-click anywhere in the script panel and, on the context menu, click Layout -> Switch active panel.
To position both panels horizontally, right-click anywhere in the script panel and, on the context menu, click
Layout -> Horizontal.
To position both panels vertically, right-click anywhere in the script panel and, on the context menu, click Layout ->
Vertical.
Outline
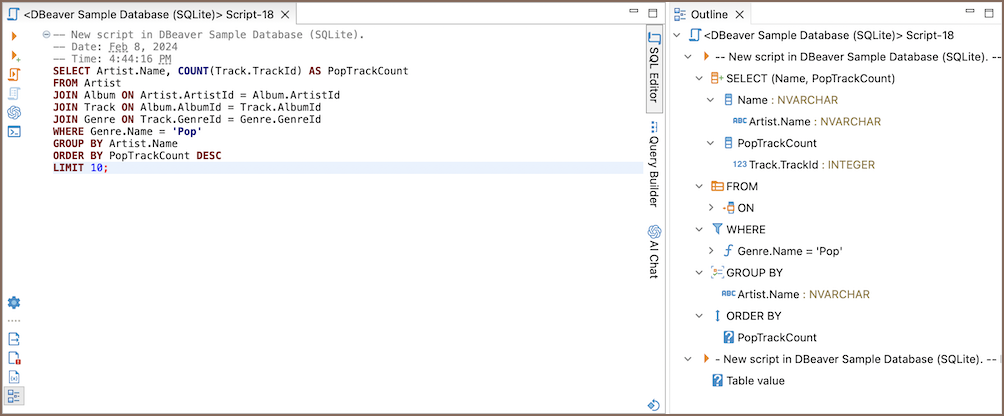
You can use the Outline feature in the SQL Editor to get a structured view of your SQL query.

Here's how you can access the Outline:
- Use the shortcut: Alt+Shift+Q, O (on macOS use ⌥⌘Q O).
- Click on the Toggle Outline button
 in the SQL Editor bottom toolbar.
 - Select Panels -> Toggle outline from the Script panel.
- Select SQL Editor -> Panels -> Toggle outline from Menu bar.
When you open the Outline, it shows a tree structure of your SQL query. This representation reflects the components of your SQL query and is beneficial for analyzing and moving through large queries. The relationship between the Outline and SQL Editor is interactive:
- The tree selection in the Outline automatically follows the cursor movement in the SQL Editor. This synchronization helps you identify the specific section of the query you are editing within its overall structure.
Alternatively, clicking an item in the Outline tree will highlight the corresponding fragment in the SQL Editor, facilitating swift navigation to different parts of your SQL query.
Features summary
The SQL Editor offers a variety of advanced features to enhance your scripting experience.
| Feature | Description | More Info |
|---|---|---|
| SQL Templates | Pre-defined SQL code snippets for quick insertion. | SQL Templates |
| SQL Assist and Auto-Complete | Helps complete SQL queries by suggesting options. | SQL Assist and Auto-Complete |
| AI SQL Assistance | Uses AI to suggest optimizations and best practices. | AI SQL Assistance (ChatGPT) |
| SQL Formatting | Automatically formats SQL queries to improve readability. | SQL Formatting |
| SQL Execution | Provides various options to execute SQL queries. | SQL Execution |
| SQL Terminal | A terminal interface for executing SQL commands. | SQL Terminal |
| Variables | Manage variables within your SQL queries. | Variables Panel Pre-configured variables |
| Query Execution Plan | Visualize the execution plan of your SQL queries. | Query Execution Plan |
| Visual Query Builder | A graphical interface for building SQL queries. | Visual Query Builder |
| Script Management | Manage multiple SQL scripts within a single editor. | Script Management |
| Client-Side Commands | Execute client-side commands within the editor. | Client-Side Commands |
